PAGE UNDER CONSTRUCTION / PENDING REVISIONS
Two Stage Boost adjustment.
Disclaimer : I may not be held responsible in any way for any damage to the vehicle (mechanical failure or other faults) or personal injury that may occur as a result of using these guides.
The Charging Pressure Control Solenoid
How it all works:
To my understanding, as a standard function, Nissan set the boost control solenoid for boost in two stages; The first stage is at 3K r.p.m. allowing 500mmHg (9.6psi ; 0.6Bar) The second stage is at 4500r.p.m when it allows the turbo to boost at 700mmHg (13psi or 0.9 Bar).
Why was this done, your wondering (I did) Its to do with altitudes. At high altitude (a nice cruise through the mountains), where the air is denser will be of good benefit to a turbo charged vehicle, but this is "lost" when in low altitude. The purpose of the dual stage is to make it equally as good in high and low altitudes.
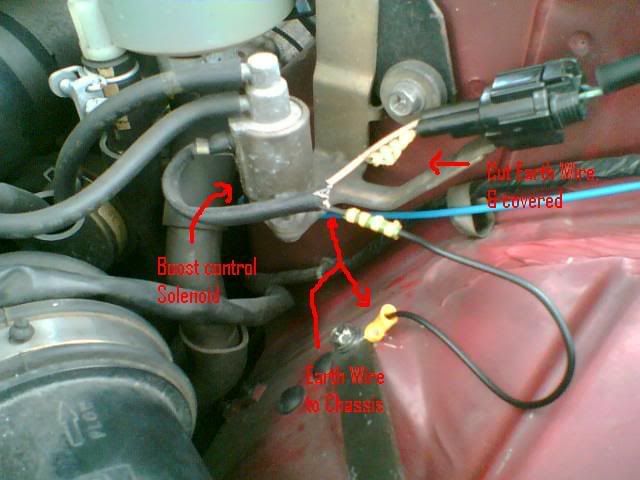
On the boost control solenoid there are two wires coming from it, a black wire and a white wire. The black wire is an earth, and when the engine is running up to 3K rpm, the solenoid is off, therefore allowing only partial boost. When the engine rpm is raised to 4500, this sends a signal to the E.C.U and earths out the solenoid, allowing to boost up to 7mm Hg.
The Theory:
Well, if you cut the earth wire, and earth it to the chassis, it should be allowing the solenoid to be working at a maximum of 7mm Hg at all times.
Update on 03/07/2007
I have done the “wire thing”, and didn’t feel it was achieving much other than fuel consumption, so reverted it back to standard.
However, what i have done, is altered the hose locations - and will admit at this point that although it does seem to have achieved a lot more power at lower rpm, I’m unaware of any direct implications of my mod, as to damage it could cause; although I don’t think any other than detonation if ecu isn’t reset would occur.
The hose running from the intercooler pipe (to manifold), has been re routed directly to the actuator, and I have left the original tube & T piece loose for the time being, so the solenoid is still there, and power still going to it as applicable from standard. 
left - tube from intercooler pipe to actuator
Right - free flowing hose from the solenoid, for information purposes, the hose above is linked to the recirc pipe.
The "how to":
Wire trip out
Tools needed:
-
side cutters & connector crimpors
-
8mm thickness earth wire approximately 10" long
-
a round head connector to fit a M10 bolt
-
2 female spade connector 1 male spade connector
The usual rules apply - ignition off, keys out, disconnect battery, press brake pedal for a few seconds and go to the front of the car.
Ok so youve got the bonnet on the stand, glaring at you is the solenoid plug, with the white, and black wire.
Cut back some of the wire "protector tubing" (which wraps both the black and white wires) enough to give you room to work with. Now, you can cut in the "half way mark" the black wire - make sure not to cut the white wire. The end of the black wire at the PLUG side, strip back about 5mm of the wires plastic cover, twist the wire cores and attach the male spade connector, then crimp it down in either end, then middle of the collapsable wire lock.
Do the same for the wire leading to the solenoid, attaching a female spade connector this time.
Finally, attach the remaining female connector to the black wire (stripping the plastic back & twisting wire); then the same at the other end of the wire with the round head connector.
Connect the round head to the chassis (ive used the air filter support bracked for this.
Now you can attach the new earth wire to the solenoid, or you can put it back to normal if you are discontent with it.

Boost Pressures Explained
Assuming the standard boost gauge is still being used, its measured in units x100 mmHg. Other boost gauges can read in either PSI (pounds per square inch) or BAR (Barometric.. forgotten lol).
1 Bar = 14.7 PSI
1 Bar = 700mm Hg (mm of mercury) - ive also seen it as 750mm Hg on some websites.
|